Floor Details
Underfloor heating systems are extremely adaptable and can be installed in both old and new buildings under a wide range of floor coverings including screed, tiles, carpet, laminates and timber.
Screeded Floors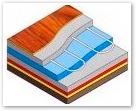
A screeded system is the most frequently used option and is widely regarded as the best structure. The screed gives excellent heat transfer properties as the heating pipes are in complete contact with the thermal mass. A typical screeded floor system is generally made up of the following elements:
Existing concrete slab
Thermal insulation
Pipe secured with cliprail or other fixings
Screed
Floor covering
Installation Method
1) Edge insulation 5mm thick & 150mm tall is fitted against all external walls to allow the screed to expand and to prevent a phenomenon called ‘cold bridging’
2) Floor insulation is laid on a dry flat level floor. If a liquid screed is to be used, all joints in the insulation are sealed at this point.
3) Cliprail is secured to the floor insulation using plastic pipe staples. The rails are laid at around 1000mm centres to ensure the pipe is held down adequately.
4) The pipe is simply clipped into the rails in accordance with design drawings and connected to the manifold. All bends and loose sections of pipe are then secured using single pipe staples.
5) Once the piping has been completed, a pressure test is carried out to confirm the integrity of the system. Once this has been passed, the screed can be laid.
Suspended Floor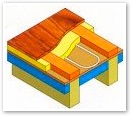
This floor construction is the most common for timber first floors and refurbishment. Heat distribution is achieved by means of heat distribution using aluminium heat diffusion plates.
The system is relatively simple to install and has the benefit of not adding significantly to the floor loading.
Suspended Floor - Installation Method
1) Support battens are secured to the floor joists at a pre-determined height
2) Sections of chipboard are then laid between the floor joints to support the insulation.
3) The EPS insulation is installed on top of the chipboard.
4) The pipe is fitted on top of the insulation, fixed using pipe staples. Where the piping crosses the joists, notches are made to fit the pipe.
5) A pressure test is carried out to ensure the integrity of the system.
6) To aid in heat distribution, sand can be placed between the joists, surrounding the UFH pipes. Alternatively, another layer of insulation can be added.
7) The finished floor is simply placed on top of the floor joists. |